Home Lab Kubernetes Cluster: Project Overview, Network Setup, and Naming Conventions
The goal of this project is to build a Kubernetes cluster in my home lab out of HP EliteDesk mini machines.
I have a 1Gbps symmetrical fiber connection, so I figured it could be cool to host small projects and websites from home. Most of the side project web apps I've built throughout the years haven't had many users, but I still like having them online. I also think it could be cool to wire up my own home lab to run GitHub Actions for my projects.
Let me say right off the bat — I know this is overkill. This whole project is wildly unnecessary, but if "girl math" is a thing then definitely "home-lab math" should also be a thing, and my home lab math for this project is that I can host my own web apps for free! (After paying tons of money up front for hardware and paying $10-20 or more for electricity each month.) It feels free. It's not free. But it feels free.
I do plan on hosting personal projects here. My thinking is that I can just launch whatever I want at home and then if anything grows and gets traction I can move it to the cloud.
I also have always had an interest in system administration ever since one of my first tech jobs as a L3 support engineer at Bluehost. Although I wasn't technically a sysadmin, I did have sudo access on all the user boxes.
Kubernetes seems to have won the container orchestration war and I think there's a lot of interesting things to be learned that could help my career. I'm still at the beginning of this project but already I've found it very interesting to try to think through the concepts of high availability, and also connecting all the dots for how to configure a cluster and connect it to the internet safely. It's already been really fun and a good learning experience, especially for someone who mostly writes code and doesn't have to think about infrastructure day to day.
Also home-labbing is just fun.
#Hardware
#Control Plane Nodes
3 identical HP EliteDesk 800 G3 minis:
- CPU: Intel Core i5-7500T (4 cores, 4 threads)
- RAM: 2 x 4GB SODIMMs
- Networking: Built-in 1GbE NIC
- OS drive: 256GB NVMe drive (pre-installed)
#Worker Nodes
3 identical HP EliteDesk 800 G6 minis:
- CPU: Core i7-10700T (8 cores, 16 threads)
- RAM: 1 x 32GB SODIMM (can add another 32GB later if I ever need to)
- Networking: 2.5GbE Flex IO V2 NIC
- Storage: 2TB WD Blue SN580 NVMe SSD
- OS drive: Misc 128GB or 256GB NVMe SSD I bought used
The control plane nodes are a little overkill for my setup but they'll do the job with some compute to spare.
I plan to use something like Longhorn for redundant block storage spread across the 3 worker nodes, so I know the networking will be a bottleneck when replicating between nodes. It'll be interesting to see if this produces noticeable latency for something like a web app, but I thought upgrading the NICs on the worker nodes to 2.5GbE would help a bit for big IO operations.
#Networking
I'm by no means a networking expert, but I wanted to have some basic setup and isolation for the cluster. Since the plan is to serve real applications, I want to make sure there is some basic network isolation — even though I will be connecting the cluster to the open internet through Cloudflare Tunnel.
I have a separate 8-port 2.5GbE managed switch that I'll plug only the Kubernetes cluster into. I created a new VLAN for the cluster to live on and specified that all the ports on the managed switch belong to that VLAN.
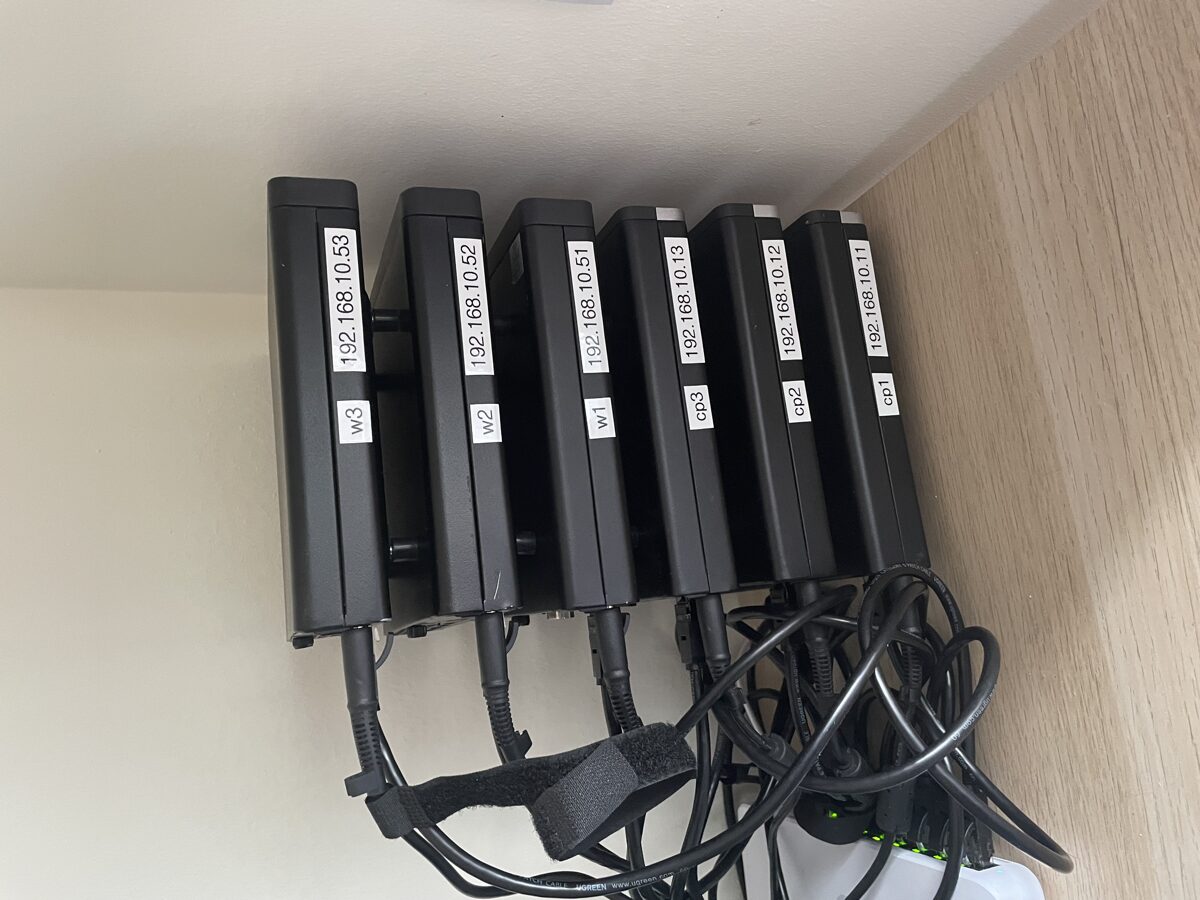
I also mapped out which IP addresses and hostnames I'll be using for each node ahead of time.
#Control Plane Nodes
Starting the control plane node IPs at 192.168.10.11 and incrementing from there.
| Node | Hostname | Static IP | Gateway | Subnet Mask | DNS Server |
|---|---|---|---|---|---|
| Control 1 | HLKubeCP01 |
192.168.10.11 |
192.168.10.1 |
255.255.255.0 |
192.168.10.1 |
| Control 2 | HLKubeCP02 |
192.168.10.12 |
192.168.10.1 |
255.255.255.0 |
192.168.10.1 |
| Control 3 | HLKubeCP03 |
192.168.10.13 |
192.168.10.1 |
255.255.255.0 |
192.168.10.1 |
#Worker Nodes
Starting the worker node IPs at 192.168.10.51 and incrementing from there.
| Node | Hostname | Static IP | Gateway | Subnet Mask | DNS Server |
|---|---|---|---|---|---|
| Worker 1 | HLKubeW01 |
192.168.10.51 |
192.168.10.1 |
255.255.255.0 |
192.168.10.1 |
| Worker 2 | HLKubeW02 |
192.168.10.52 |
192.168.10.1 |
255.255.255.0 |
192.168.10.1 |
| Worker 3 | HLKubeW03 |
192.168.10.53 |
192.168.10.1 |
255.255.255.0 |
192.168.10.1 |
And I'll be careful to add a sticker label on the chassis of each machine once I've configured them so I don't get them mixed up.
#Benefits of This Setup
- Low power draw. Each node draws around 11-12W idle. That's the whole 6-node cluster running on roughly what a single light bulb uses.
- Small form factor. The EliteDesk minis are tiny. The whole cluster stacks up neatly and doesn't take up much space.
- Quiet. These machines are nearly silent, which matters when it's sitting in your house.
#Drawbacks of This Setup
- No ECC RAM. These consumer-grade machines don't support ECC memory, so there's no hardware-level protection against memory bit flips. For a home lab running side projects this is totally fine, but it's worth noting if you're thinking about running anything mission-critical.
- Consumer-grade hardware. These are refurbished office desktops, not servers. No redundant power supplies, no hot-swappable drives. But for the price point and the use case, I think it's a great trade-off.
#What's Next
In the next posts in this series, I'll cover installing Talos Linux on bare metal, setting up Flux CD for GitOps, configuring Longhorn for persistent storage, and running PostgreSQL with CloudNativePG. It's been a journey with plenty of mistakes along the way — I'll share all of them.